11 dbt-core is an orchestrator that makes managing pipelines simpler
Note
- In this chapter, we will cover the
dbt-corelibrary, which is open source. The dbt company provides managed services viadbt-cloud, which we will not cover in this chapter. - All the code in this chapter assumes you have followed the setup steps shown here and started the necessary containers.
We saw how to process data in layers, from source to stage to core to marts, in the data flow chapter.
While we can write code to maintain these pipelines, it will be a lot of work.
This is where dbt comes in. dbt is a Python tool that simplifies transforming data using just SQL. dbt is meant to make the transformation part of your data pipeline, which is often where the bulk of work happens, easy to build and maintain.
In addition, dbt also enables best practices like
- Data testing
- Full snapshot & incremental data processing capabilities
- Functionality to easily create SCD2 tables
- Version-controlled data pipelines
- Separation of concerns via folders based on the multi-hop architecture
- Multiple data materialization options, like creating a data model as a table/view/materialized views, etc
- Ability to connect to multiple data processing systems
dbt assumes that the data is already accessible to the database engine on which you run it. As such, it is mainly used for the T (Transform) part of your pipeline.
Let’s run dbt inside the airflow container, as shown below.
docker exec -ti airflow-spark bash # bash into the running docker container

# The following commands are run inside the scheduler docker container

cd $AIRFLOW_HOME

uv run dbt run --profiles-dir /home/airflow/tpch_analytics/ --project-dir /home/airflow/tpch_analytics/ # run dbt models
uv run dbt test --profiles-dir /home/airflow/tpch_analytics/ --project-dir /home/airflow/tpch_analytics/# test the created dbt models
Note We use uv run ... because we use uv to install our Python modules and uv run ... allow us to use the installed module, of which dbt is one.
11.1 A sql script with a select statement creates a data model
In dbt, every .sql file contains a select statement and is created as a data model.
Note We use the term data model because with dbt we can define what a data model should be, ie, should it be a table, a view, a materialized view, etc. This is called materialization.
The select statement defines the data schema of the data model. The name of the .sql file specifies the name of the data model.
Let’s take a look at one of our silver tables, a dim_customer
with customer as (
    select *
    from {{ ref('stg_customer') }}
),

nation as (
    select *
    from {{ ref('stg_nation') }}
),

region as (
    select *
    from {{ ref('stg_region') }}
)

select
    c.customer_key,
    c.customer_name,
    n.nation_name,
    n.nation_comment,
    r.region_name,
    r.region_comment
from customer as c
left join nation as n on c.nation_key = n.nation_key
left join region as r on n.region_key = r.region_key
We can see how the final select query is created as a data model.
The ref function refers to another data model. Remember the stg_customer, stg_nation, & stg_region are also data models in the staging folder. Our projects folder structure is shown below.
airflow/tpch_analytics/models
├── marts
│   ├── core
│   │   ├── core.yml
│   │   ├── dim_customer.sql
│   │   ├── fct_lineitem.sql
│   │   ├── fct_orders.sql
│   │   ├── wide_lineitem.sql
│   │   └── wide_orders.sql
│   └── sales
│       ├── customer_outreach_metrics.sql
│       ├── order_lineitem_metrics.sql
│       └── sales.yml
└── staging
    ├── src.yml
    ├── stage.yml
    ├── stg_customer.sql
    ├── stg_lineitem.sql
    ├── stg_nation.sql
    ├── stg_orders.sql
    └── stg_region.sql
The ref function only works for data models that dbt creates. When you need to use data in the warehouse that was not created by dbt (typically the raw data), you will need to define it in a yml file and access it using the source function.
Here is our src.yml file
---
version: 2
sources:
  - name: source
    description: Data from application database, brought in by an EL process.
    schema: prod_db
    tables:
      - name: customer
      - name: nation
      - name: region
      - name: orders
      - name: lineitem
And now we can use the source function to access these, as shown in the stg_lineitem.sql file below:
select
    l_orderkey as order_key,
    l_linenumber as line_number
from {{ source('source', 'lineitem') }}
11.2 Define how your project should work at dbt_project.yml
All configurations that define how your project should be in dbt_project.yml, such as
- Which folder to look in for the data model sql files
- Which folders to look in for seed data
- Which folders to look in for custom tests, custom macros(functions with SQL)
- How to materialize data models based on their folder paths, etc
11.3 Define connections in profiles.yml
dbt uses a yml file to define how it connects to your db engine. Let’s look at our profiles.yml
tpch_analytics:
  target: local
  outputs:
    local:
        type: spark
        method: session
        schema: prod_db
        host: localhost                           # not used, but required by `dbt-core`
We tell dbt to connect to Apache Spark. The target variable defines the environment. The default is dev, but you can specify which environment to run on with --target flag in the dbt run command.
By default, dbt will look for a profiles.yml in your HOME directory. We can tell dbt to look for the profiles.yml file in a specific folder using the --profiles-dir flag as shown below.
uv run dbt run --profiles-dir /home/airflow/tpch_analytics/ --project-dir /home/airflow/tpch_analytics/11.4 Define documentation & tests with yml files
You can also document what the table and the columns of your tables mean in yml files. These yml files have to be within the same folder and also reference the data model’s name and the column names.
In addition to descriptions, you can also specify any tests to be run on the columns as needed.
The documentation will be rendered when you run the dbt render command, and HTML files will be created, which we will view with a dbt serve command in the next chapter.
The tests can be run with the dbt test command. Note that the tests can only be run after the data is available.
Here are the documentation and tests to be run for our dim_customer.sql model at core.yml
models:
  - name: dim_customer
    description: "Customer dimension table containing customer details enriched with geographic information (nation and region)"
    columns:
      - name: customer_key
        description: "Unique identifier for each customer (primary key)"
        tests:
          - unique
          - not_null
      - name: customer_name
        description: "Full name of the customer"
        tests:
          - not_null
      - name: nation_name
        description: "Name of the nation/country where the customer is located"
      - name: nation_comment
        description: "Additional comments or notes about the customer's nation"
      - name: region_name
        description: "Name of the geographic region where the customer is located"
      - name: region_comment
        description: "Additional comments or notes about the customer's region"
Run the tests as shown below:
docker exec -ti airflow-spark bash # bash into the running docker container
cd $AIRFLOW_HOME
uv run dbt run --profiles-dir /home/airflow/tpch_analytics/ --project-dir /home/airflow/tpch_analytics/ # run dbt models
uv run dbt test --profiles-dir /home/airflow/tpch_analytics/ --project-dir /home/airflow/tpch_analytics/# test the created dbt models
11.5 dbt recommends the 3-hop architecture with stage, core & data marts
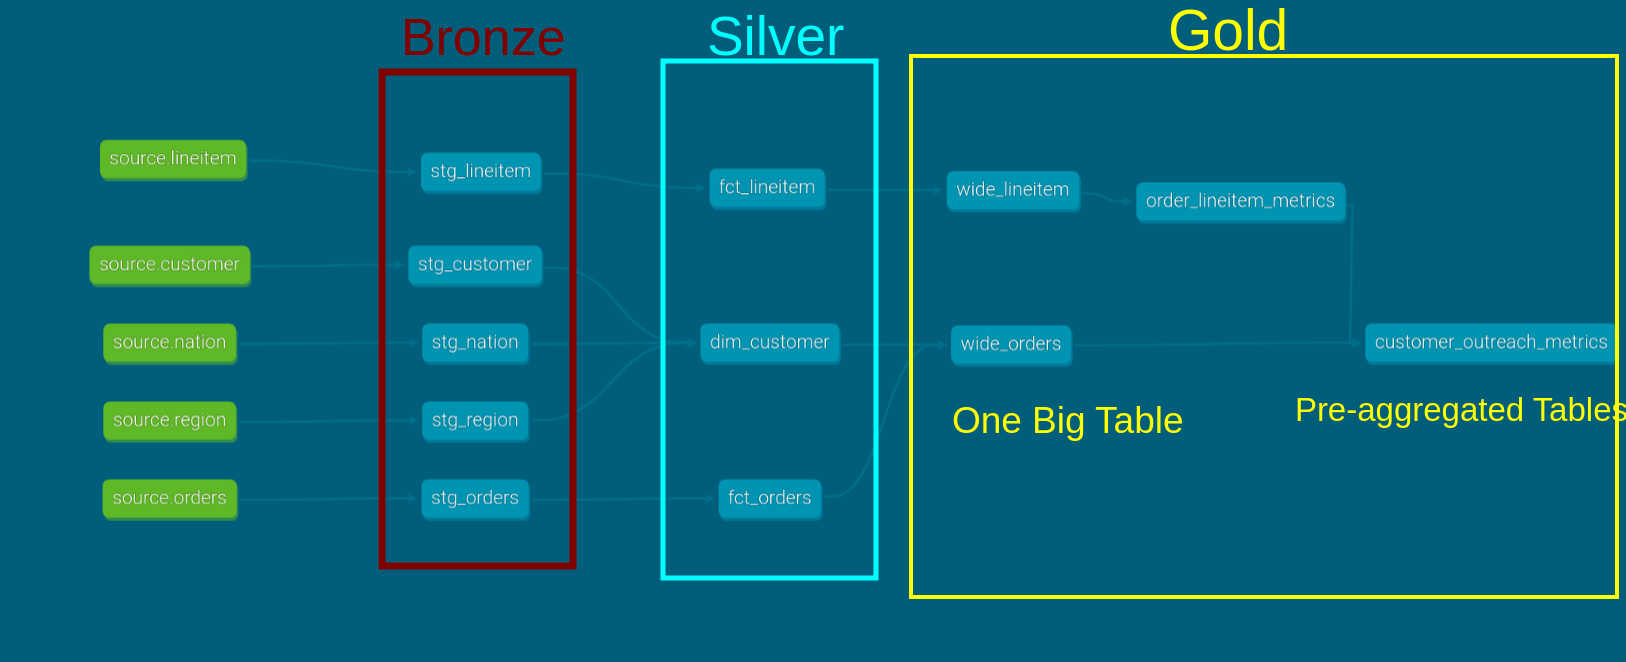
We covered how to transform data using the multi-hop architecture in the data flow chapter. Let’s see how to implement this in dbt.
11.5.1 Source
Source tables refer to tables already present in the warehouse. In our case, these are the base tpch tables, which are created by the extract step.
We need to define what tables are the sources in the src.yml file, which will be used by the stage tables with the source function.
---
version: 2
sources:
  - name: source
    description: Data from application database, brought in by an EL process.
    schema: prod_db
    tables:
      - name: customer
      - name: nation
      - name: region
      - name: orders
      - name: lineitem
11.5.2 Staging
The staging area is where raw data is cast into correct data types, given consistent column names, and prepared for transformation into models used by end-users.
You can think of this stage as the first layer of transformations. We will place staging data models inside the staging folder, as shown below.
models/
├── marts
│   ├── core
│   │   ├── core.yml
│   │   ├── dim_customer.sql
│   │   ├── fct_lineitem.sql
│   │   ├── fct_orders.sql
│   │   ├── wide_lineitem.sql
│   │   └── wide_orders.sql
│   └── sales
│       ├── customer_outreach_metrics.sql
│       ├── order_lineitem_metrics.sql
│       └── sales.yml
└── staging
│   ├── src.yml
│   ├── stage.yml
│   ├── stg_customer.sql
│   ├── stg_lineitem.sql
│   ├── stg_nation.sql
│   ├── stg_orders.sql
│   └── stg_region.sql
├── dbt_project.yml
└── profiles.yml
Their documentation and tests will be defined in a yml file.
11.5.3 Marts
Marts consist of the core tables for end-users and business vertical-specific tables.
11.5.3.1 Core
The core defines the fact and dimension models to be used by end-users. We define our facts and tables under the marts/core folder.
You can see that we store the facts, dimensions, and OBT under this folder.
11.5.3.2 Stakeholder team specific
In this section, we define the models for sales stakeholders. A project can have multiple business verticals. Having one folder per business vertical provides an easy way to organize the models.
11.6 dbt-core is a cli
With our data model defined, we can use the dbt CLI to run, test, and create documentation.
The dbt command will look for the profiles.yml file in your $HOME directory by default, so we either have to set the PROFILES_DIR environment variable or use the --profiles-dir as part of the cli command.
11.6.1 dbt run
We have the necessary model definitions in place. Let’s create the models.
docker exec -ti airflow-spark bash # bash into the running docker container
cd $AIRFLOW_HOME
uv run dbt run --profiles-dir /home/airflow/tpch_analytics/ --project-dir /home/airflow/tpch_analytics/
exit
11.6.2 dbt docs
One of the powerful features of dbt is its docs. To generate documentation and serve it, run the following commands:
docker exec -ti airflow-spark bash # bash into the running docker container
cd $AIRFLOW_HOME
uv run dbt run --profiles-dir /home/airflow/tpch_analytics/ --project-dir /home/airflow/tpch_analytics/
uv run dbt docs generate --profiles-dir /home/airflow/tpch_analytics/ --project-dir /home/airflow/tpch_analytics/
uv run dbt docs serve --profiles-dir /home/airflow/tpch_analytics/ --project-dir /home/airflow/tpch_analytics/--host 0.0.0.0 --port 8081
# Ctrl + C
exit # exits docker bash
The generate command creates documentation in HTML format. The serve command will start a web server that serves this HTML file.
Open the documentation by going to http://localhost:8081.
Navigate to customer_orders within the sde_dbt_tutorial project in the left pane.
Click on the “View Lineage Graph” icon on the lower right side. The lineage graph shows the dependencies of a model.
You can also view the tests defined, their descriptions (set in the corresponding YAML file), and the compiled SQL statements.
11.7 Scheduling
We have seen how to create models, run tests, and generate documentation. These are all commands run via the command line interface (CLI).
DBT compiles the models into SQL queries under the target folder (not part of the Git repository) and executes them on the data warehouse.
To schedule dbt runs, snapshots, and tests, we need to use a scheduler. In ne chapter, we will use Airflow to schedule this dbt pipeline.