10 Docker recreates the same environment for your code in any machine
You can think of Docker as running a separate OS (not precisely, but close enough) called containers on a machine.
Docker provides the ability to replicate the OS and its packages (e.g., Python modules) across machines, so you don’t encounter “hey, that worked on my computer” type issues.
10.1 A Docker image is a blueprint for your container
An image is a blueprint for creating your Docker container. In an image, you can define the modules to install, variables to set, etc, and then use the image to create multiple containers.
Let’s consider our Airflow Dockerfile:
FROM python:3.13-bookworm

WORKDIR /home/airflow

# Install Java
RUN apt-get update && apt-get install -y --no-install-recommends \
    curl \
    ca-certificates \
    openjdk-17-jdk \
    wget \
    make \
    procps \
    && rm -rf /var/lib/apt/lists/*

ENV JAVA_HOME=/usr/lib/jvm/java-17-openjdk-amd64
ENV PATH=$JAVA_HOME/bin:$PATH

# Install Spark
ENV SPARK_VERSION=4.0.1
ENV SPARK_HOME=/opt/spark
RUN wget -q https://archive.apache.org/dist/spark/spark-${SPARK_VERSION}/spark-${SPARK_VERSION}-bin-hadoop3.tgz && \
    tar -xzf spark-${SPARK_VERSION}-bin-hadoop3.tgz && \
    mv spark-${SPARK_VERSION}-bin-hadoop3 ${SPARK_HOME} && \
    rm spark-${SPARK_VERSION}-bin-hadoop3.tgz
ENV PATH=$PATH:$SPARK_HOME/bin
# Link for Iceberg from https://iceberg.apache.org/releases/
RUN wget https://repo1.maven.org/maven2/org/apache/iceberg/iceberg-spark-runtime-4.0_2.13/1.10.1/iceberg-spark-runtime-4.0_2.13-1.10.1.jar -P ${SPARK_HOME}/jars/
COPY ./spark_defaults.conf $SPARK_HOME/conf/spark-defaults.conf

# Install uv
ADD https://astral.sh/uv/install.sh /uv-installer.sh
RUN sh /uv-installer.sh && rm /uv-installer.sh
ENV PATH="/root/.local/bin/:$PATH"

# Airflow environment variables
ENV AIRFLOW_HOME=/home/airflow
ENV AIRFLOW__CORE__DAGS_ARE_PAUSED_AT_CREATION=true
ENV AIRFLOW__CORE__LOAD_EXAMPLES=false
ENV AIRFLOW__CORE__FERNET_KEY=''
ENV AIRFLOW__CORE__SIMPLE_AUTH_MANAGER_ALL_ADMINS=true
ENV AIRFLOW__DAG_PROCESSOR__REFRESH_INTERVAL=3

# Install Airflow
ENV AIRFLOW_VERSION=3.1.3
ENV PYTHON_VERSION=3.13
ENV CONSTRAINT_URL="https://raw.githubusercontent.com/apache/airflow/constraints-${AIRFLOW_VERSION}/constraints-no-providers-${PYTHON_VERSION}.txt"

RUN uv venv /home/airflow/.venv
RUN uv pip install "apache-airflow==${AIRFLOW_VERSION}" --constraint "${CONSTRAINT_URL}"
RUN uv pip install pyspark==4.0.1 'pyspark[sql]==4.0.1'
RUN uv pip install ruff
RUN uv pip install jupyterlab
RUN uv pip install dbt dbt-core dbt-spark[session]
RUN uv pip install duckdb
RUN uv pip install plotly

# Copy IPython startup scripts
COPY ./ipython_scripts/startup/ /root/.ipython/profile_default/startup/

# mkdir warehouse and spark-events folder
RUN mkdir -p /home/airflow/warehouse
RUN mkdir -p /home/airflow/spark-events

COPY startup.sh /startup.sh
RUN chmod +x /startup.sh

CMD ["/startup.sh"]
The commands in the Docker image are run in order. Let’s go over the key commands:
FROM: We need a base operating system on which to set our configurations. We can also utilize existing Docker images available on Docker Hub (an online store where people can upload and download images from) and build upon them. In our example, we use the official Python + Debian Stable- We install
Java, Spark, Iceberg, UV, Airflow, necessary Python libraries. COPY: Copy is used to copy files or folders from our local filesystem to the image. In our image, we copy the startup.sh which is a script to start Airflow and Jupyter Lab servers.ENV: This command sets the image’s environment variables. In our example, we set Java, Spark Paths, and Airflow variables.CMD: The command inside isCMDis executed when we build our container. In our case this will start Airflow and Jupyter Lab servers.
10.2 Sync data & code between a container and your local filesystem with volume mounts
When we are developing, we’d want to make changes to the code and see its impact immediately. While you can use COPY to copy your code when building a Docker image, it will not reflect changes in real-time, and you will have to rebuild your container each time you need to change your code.
In cases where you want data/code to sync two ways between your local machine and the running Docker container, use mounted volumes.
In addition to syncing local files, volumes can also sync files between running containers.
In our docker-compose.yml (which we will go over below), we mount the following folders in our local filesystem into a specified path inside a container.
volumes:
      - ./airflow/dags:/home/airflow/dags
      - ./airflow/tpch_analytics:/home/airflow/tpch_analytics
      - ./notebooks:/home/airflow/notebooks
      - ./README.md:/home/airflow/README.md
10.3 Ports to accept connections
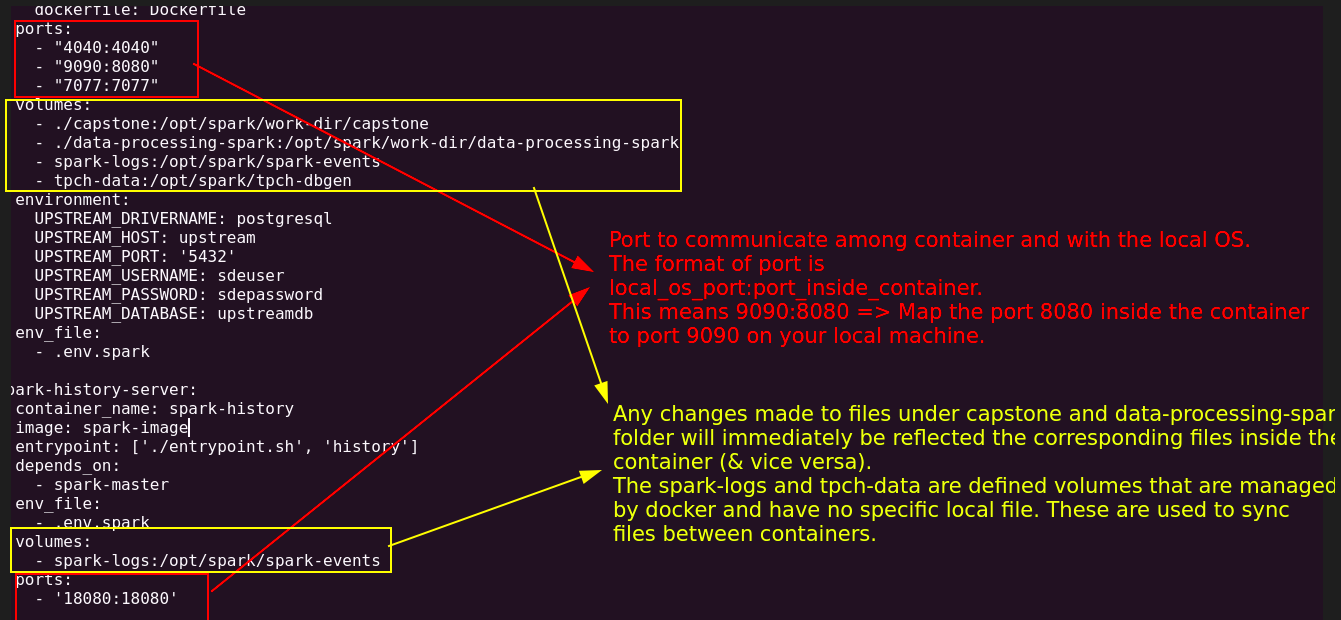
Most data systems also expose runtime information, documentation, UI, and other components via ports. We have to inform Docker which ports to keep open so that they are accessible from the “outside”, in our case, your local browser.
In our docker-compose.yml, we keep the following ports open
ports:
  - "8080:8080"   # Airflow webserver
  - "4040:4040"   # Spark UI
  - "8888:8888"   # Jupyter Lab
  - "8081:8081"   # dbt docs
Note In - 8080:8080, the RHS (right-hand side) 8080 represents the port inside the container, and the LHS (left hand side) 8080 indicates the port that the internal one maps to on your local machine.
Shown below is another example of how ports and volumes enable communication and data sharing respectively across containers and your os:
10.4 Docker cli to start a container and docker compose to coordinate starting multiple containers
We can use the docker cli to start containers based on an image. Let’s look at an example. To start a simple metabase dashboard container, we can use the following:
docker run -d --name dashboard -p 3000:3000 metabase/metabaseThe docker command will look for containers on your local machine and then in docker hub matching the name metabase/metabase.
However, with most data systems, we will need to ensure multiple systems are running. While we can use the docker CLI to do this, a better option is to use docker compose to orchestrate the different containers required.
With docker compose, we can define all our settings in one file and ensure that they are started in the order we prefer.
With our docker-compose.yml defined, starting our containers is a simple command, as shown below:
docker compose up -d --buildThe command will, by default, look for a file called docker-compose.yml in the directory in which the command is run.
10.5 Executing commands in your Docker container
Using the exec command, you can submit commands to be run in a specific container. For example, we can use the following to open a bash terminal in our scheduler container. Note that the scheduler is based on the container_name setting.
docker exec -ti airflow-spark bash
# You will be in the master container bash shell
# try some commands
pwd
exit # exit the container
Note that the -ti indicates that this will be run in an interactive mode. As shown below, we can run a command in non-interactive mode and obtain an output.
docker exec airflow-spark echo hello
# prints hello